Hello everyone,
It’s been a bit since I last shared an update. I’ve been deeply engrossed in my Excel tables and estimations for about the last 9 months. However, I’ve developed some strategies that have significantly streamlined my workflow, and I believe they could be beneficial for others as well.
First off, I want to express my gratitude to everyone who nudged me towards this Autohotkey journey, from the IT team to my directors, and all who shared their insights. It seems it’s finally time to reap the benefits. In a subsequent post, I’ll delve into Jim Deng’s method, which utilizes Razer Tartarus Keypads and Razer’s native macro software instead of Autohotkey and scripts. I’ll compare the two approaches in a future entry.
The following guidelines are for those who, like me, start their day with CostX at 9:00 am on weekdays, aiming to prevent repetitive strain injury (RSI) and to spare extra time for that additional cup of coffee or a moment in the sunshine for some vitamin D generation.
Let’s dive in. We’ll begin by configuring shortcut keys in our trusted CostX software as follows:

Alt + 1 > Undo,
Alt + 2 > Redo, Alt + 3 > Add Dimension Group,
Alt + 4 > Drawing Properties,
Alt + 5 > Dimension Properties,
Alt + 6 > Zoom Extents,
Alt + 7/8 > Line/Point Mode

Next, visit https://www.autohotkey.com/ and download the software.
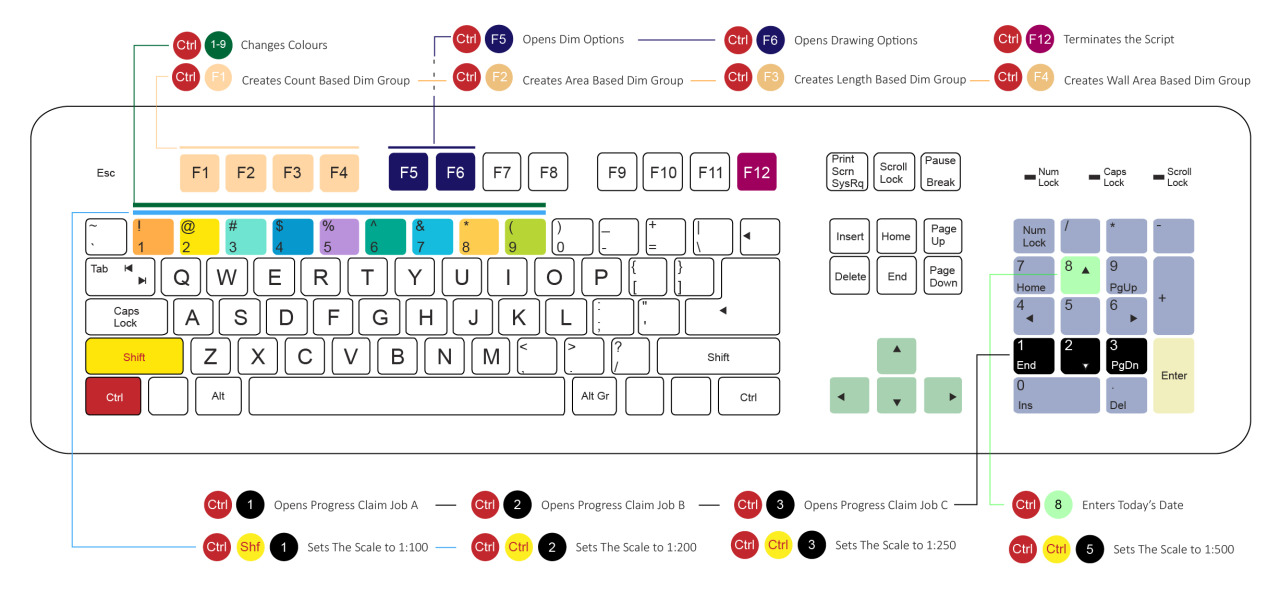
Before we get into the script, let’s address a key feature: assigning random colors to dimension groups. This practice aids the reviewer by distinguishing each dimension group with unique colors, making it easier to understand the estimation at a glance. Without varied colors, it becomes challenging to discern which dimensions cover specific plan areas.
To address this, I’ve devised a color array in the script:
RandomColor:

Colours := [“Bottle”,“Orange”,“Aqua”,“Dogg”,“Mediterranean Blue”,“Purple”,“Tan”,“Choc”,“Blue”]

CostXColours := [“Chocolate”,“Tan”,“Orange”,“Goldenrod”,“Gold”,“Sand”,“Olive”,“Avocado”,“Bottle Green”,“Green”,“Lawn Green”,“Grass Green”,“Lime”,“Light Green”,“Spearmint”,“Aqua”,“Teal”,“Mediterranean Blue”,“Sky Blue”,“Dodger Blue”,“Battleship”,“Navy”,“Dark Blue”,“Royal Blue”,“Cadet Blue”,“Blue”,“Dark Purple”,“Purple”,“Lavender”,“Lilac”]

random, i, 1, % CostXColours.count()

random, v, 1, % Colours.count()

Return
This array includes a wide range of colors available in CostX.
Here’s a snippet to automate dimension grouping with a random color assignment:
#IfWinActive, ahk_class RAIL_WINDOW
^F1:: ; Assigns the 'Add Dimension Group' button to Quick Cast on the top menu, working with Ctrl+3 for Area
Send <!3
Send ^v
Send {Tab 2}
Send {C}
Send {Tab 6}
Gosub RandomColor
Send, % CostXColors[i]
Send {Tab 13}
Send {End}
Return
Pressing Ctrl+F1 triggers the above script, automating several steps in CostX with the defined shortcuts and randomly assigned colors.
Now, let’s set up our progress claim job folders for easy access via Numpad shortcuts. Edit the Autohotkey script to include the following code, adjusting the folder path as needed:
; Dennis's Numpad Shortcuts
^Numpad1:: ; OPENS MY PROGRESS CLAIMS 1 FOLDER
Run, U:\documents\2017\Project A
WinActivate
WinMaximize
Return
Cheers,
Happy estimating, everyone! Now, you can fully leverage CostX.
Please note, if anything goes awry, pressing Ctrl + F12 will terminate the script.
Best of luck!
Leave a Reply